Here’s the thing about making large, sweeping resolutions on the Internet: you actually have to follow through with them or the Internet gets mad. At least I think that’s how the Internet works.
I knew from the start of the journey to Inbox Zero that Part 2 would likely be the most challenging, since it would involve going through the enormous number of emails that have been clogging up my Inbox for (literally) years. It would mean confronting my email hoarding problem head-on and facing my fears by getting rid of them once and for all. Turns out you can’t have Inbox Zero if your Inbox isn’t empty.
Verdict: Yeah, it’s a little painful at times. But ultimately, it feels AWESOME. Here’s how I did it.
Step One: Clean It Up.
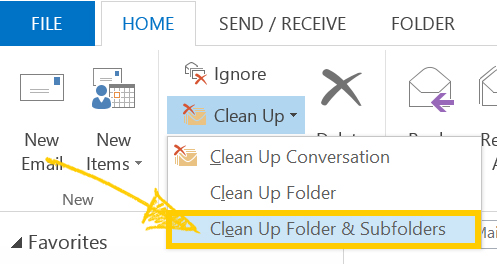
I decided to start with the easy stuff—and it doesn’t get any easier than the Clean Up tool to build your confidence. On the Home tab, in the Delete group, click Clean Up. From here, you can delete redundant messages in a selected conversation, the current folder, or the current folder and all of its subfolders. Since I had some drastic cuts to make, I went whole-hog and went for my Inbox and all of its subfolders. A couple of clicks deleted a ton of messages that I know I don’t need—I didn’t even have to think about it!

Step Two: Go Back in Time.
Let’s get real: we probably don’t need those summer company picnic invitations from 2010. The traditional Inbox is arranged so your most recent conversations appear at the top. But if you click Newest in the upper-right corner of your message preview window, it will switch your view to show the oldest messages first. From there, you can batch delete any old messages (like all messages from 2010, which in my case was when I was working in a totally different department) with ease.

Step Three: Pick Your Friends.
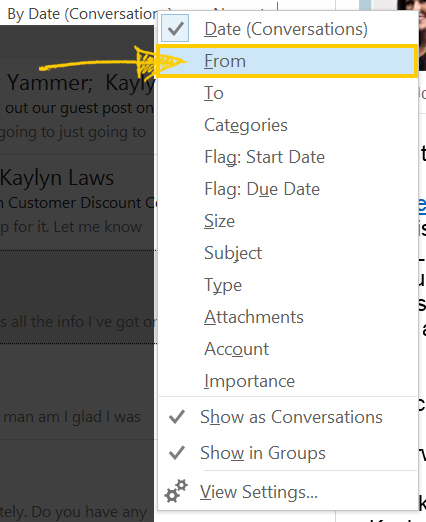
Here’s a tip that surprised with me with just how useful it was in cleaning up my Inbox. In the same toolbar where we changed how our messages were ordered by date, you can also group your messages by sender. Just click By Date and then select From. While it doesn’t sound super useful, it actually made getting rid of junk like subscription emails, emails from old coworkers, and old Yammer notifications really simple since they were all in very easily identifiable groups.

Step Four: Do It Yourself.
Sadly, Outlook can’t automate EVERYTHING for you, so there is a bit of manual labor involved near the end of the process. After Step 3, I was left with about 90 emails that I had to glance through to make my final cuts. Not bad, considering where I started! And no, I’m not telling you where I started, so stop asking.
What's Next?
My Inbox isn’t quite at zero yet since my Inbox still contains messages that need to be addressed in one way or another. The next step: getting organized and making sure all of those messages have a home and a purpose. Tune in next week to see how we do it!
